
php程序员习惯了将程序直接上传到服务器上,简单编辑一下php-fpm以及nginx/apache的配置文件就完成上线了。而Ruby的Web项目在上线发布时,给人感觉要复杂的多。这种感觉来自于错误的直觉:
-
git导致了很多额外的工作量:
由于git已经被作为必备的版本控制工具,因此正式发布时也应该从git服务器上获取指定版本的代码。实际上正规团队开发的php开发项目也会这么做。
-
Ruby on Rails的安装要比php复杂:
原因主要还是RoR太小众,所以没有大家对于php的安装那么熟悉。实际情况是工作量并没有比安装php多更多。
-
puma等ruby应用服务器的启动参数太复杂:
表面看起来是这样。[rails项目]/config/puma.rb文件里配置,或者直接在puma命令行启动时的参数,有很多不熟悉的参数。稍微用错了参数,就会导致puma不启动或者出现各种问题,让新手精疲力尽。
其实我们都觉得简单的php应用的启动过程,一点不比puma简单多少。例如php-fpm也需要配置
/etc/php-fpm.d/www.conf文件,有时候还需要修改/etc/php.ini文件。
所以,本质上Ruby on Rails的发布及上线过程和php项目上线的工作量是一样的,而且ruby项目上线更有capistrano、mina等自动发布工具。前提是你首先得掌握这些工具,不然这些自动化工具除了省不了时间,还会增加额外的工作量。
mina是一款由ruby开发的自动化部署工具。使用mina以后,每次rails代码提交时的部署,一键完成部署,避免了提交到git服务器后,又去服务器上git pull的情况。
这里记录的是配置ruby + puma + github + mina 发布工具的方法。
一、CentOS服务器主机上的renv+ruby环境准备
-
创建ruby项目专用的用户,在该用户下配置ruby及rails环境。
-
确保CentOS系统已经安装git
# yum -y install git -
如果开发的项目是托管在github私有账号下的,那么需要将应用服务器的ssh公钥加到github的信任白名单中,否则无法获取github授权。
#在CentOS服务器的deploy专用账号下,使用ssh-keygen命令在本地主机生成密钥对:
cd ~/.ssh
ssh-keygen -t rsa
登陆到github账号,打开需要访问的
repository,在Settings->Deploy keys页面,创建ssh key记录。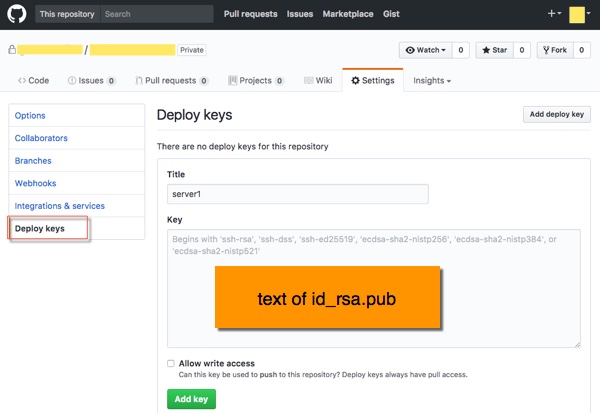
也可以为所有项目创建ssh key。
Settings->SSH and GPG keys页面,新创建一个ssh key,将id_rsa.pub的字符串(注意没有换行)复制到key文本框内,保存。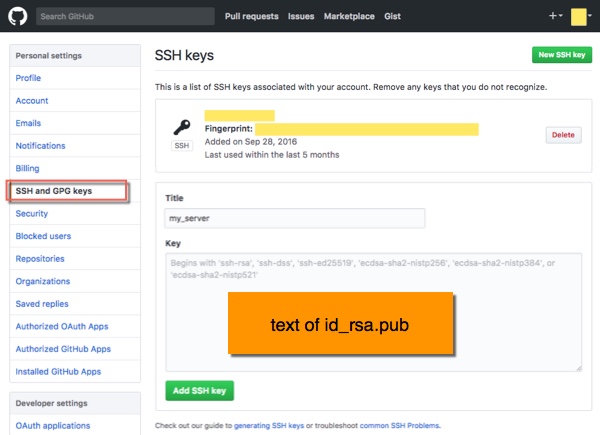
二、macOS开发环境的环境准备
-
如果还没有创建ssh秘钥对,则在开发机生成ssh秘钥对。
cd ~/.ssh ssh-keygen -t rsa -
登陆github账号,将开发机的
id_rsa.pub的内容保存到Settings->SSH and GPG keys的一条记录里。 -
将公钥添加到远程CentOS服务器deploy用户名下的authorized_keys文件中, 使用命令:
# 例如服务器地址是xxx.xxx.xxx.xxx
ssh-copy-id -i ~/.ssh/id_rsa.pub deploy@xxx.xxx.xxx.xxx

# 服务器SSH的端口需要指定时的用法
ssh-copy-id -i ~/.ssh/id_rsa.pub deploy@xxx.xxx.xxx.xxx -p 2233
三、ruby项目里添加mina以及dotenv-railsgem
-
在
Gemfile里添加minagem 'mina' -
在
Gemfile里添加dotenv-rails(可选)puma等ruby应用在启动时,经常需要读取系统的环境变量,例如
RAILS_ENV以及SECRET_KEY_BASE。可以通过命令行加参数的方法,也可以直接使用linux的export命令赋值。不过dotenv-rails的使用方法更简单,安装了这个gem以后,可以直接读取在项目根目录下的.env里面的参数配置。gem 'dotenv-rails' -
安装gem
bundle install
四、编辑[rail项目]/config/deploy.rb脚本
-
我的mina脚本中增加了对puma的控制任务。这部分的代码主要来源于mina-puma。考虑到学习及更个性化的定制的需求,这里将mina-puma的源代码直接复制到这里。除了将’pumactl_socket’改成了’puma_socket’以外,以及去掉了端口方式启动才有的
--control启动参数,其它未做改动。 -
[rail项目]/config/deploy.rb脚本的内容:
# For help in making your deploy script, see the Mina documentation:
#  - https://github.com/mina-deploy/mina/tree/master/docs
#
require 'mina/bundler'
require 'mina/rails'
require 'mina/git'
require 'mina/rbenv' # for rbenv support. (https://rbenv.org)
# require 'mina/rvm'    # for rvm support. (https://rvm.io)

# Basic settings:
set :domain, 'my_server_host' # The hostname to SSH to.
set :deploy_to, '/opt/ruby/[my_project]' #Path to deploy into.
set :repository, 'git@github.com:[myusename]/[my_project].git' # Git repo to clone from. (needed by mina/git)
set :branch, 'master' #Branch name to deploy. (needed by mina/git)

# Optional settings:
set :port, '22' # SSH port number.
set :forward_agent, true # SSH forward_agent.
set :user, 'deploy' # Username in the server to SSH to.

# shared dirs and files will be symlinked into the app-folder by the 'deploy:link_shared_paths' step.
# set :shared_dirs, fetch(:shared_dirs, []).push('somedir')
# set :shared_files, fetch(:shared_files, []).push('config/database.yml', 'config/secrets.yml')
# set :shared_paths, ['config/database.yml', 'log', 'config/secrets.yml']
set :shared_dirs, ['log', 'tmp', 'public/assets']
set :shared_files, ['config/database.yml', 'config/puma.rb', '.env', 'config/secrets.yml']

# 将几个set参数简化成ruby变量
deploy_to = fetch(:deploy_to)
current_path = fetch(:current_path)
shared_path = fetch(:shared_path)

# This task is the environment that is loaded for all remote run commands, such as
# `mina deploy` or `mina rake`.
task :environment do
  # If you're using rbenv, use this to load the rbenv environment.
  # Be sure to commit your .ruby-version or .rbenv-version to your repository.
  invoke :'rbenv:load'

  # For those using RVM, use this to load an RVM version@gemset.
  # invoke :'rvm:use', 'ruby-1.9.3-p125@default'
end

# Put any custom commands you need to run at setup
# All paths in `shared_dirs` and `shared_paths` will be created on their own.
task :setup do
  # command %{rbenv install 2.3.0}
  command %[mkdir -p "#{shared_path}/public/assets"]
  command %[chmod g+rx,u+rwx "#{shared_path}/public/assets"]

  # 在服务器项目目录的shared中创建log文件夹
  command %[mkdir -p "#{shared_path}/log"]
  command %[chmod g+rx,u+rwx "#{shared_path}/log"]

  # 在服务器项目目录的shared中创建config文件夹 下同
  command %[mkdir -p "#{shared_path}/config"]
  command %[chmod g+rx,u+rwx "#{shared_path}/config"]

  command %[touch "#{shared_path}/config/database.yml"]
  command %[touch "#{shared_path}/config/secrets.yml"]

  # puma.rb 配置puma必须得文件夹及文件
  command %[mkdir -p "#{shared_path}/tmp/pids"]
  command %[chmod g+rx,u+rwx "#{shared_path}/tmp/pids"]

  command %[mkdir -p "#{shared_path}/tmp/sockets"]
  command %[chmod g+rx,u+rwx "#{shared_path}/tmp/sockets"]

  command %[touch "#{shared_path}/config/puma.rb"]
  command %[echo "-----> Be sure to edit 'shared/config/puma.rb'."]

  # tmp/sockets/puma.state
  command %[touch "#{shared_path}/tmp/sockets/puma.state"]
  command %[echo "-----> Be sure to edit 'shared/tmp/sockets/puma.state'."]

  # log/puma.stdout.log
  command %[touch "#{shared_path}/log/puma.stdout.log"]
  command %[echo "-----> Be sure to edit 'shared/log/puma.stdout.log'."]

  # log/puma.stdout.log
  command %[touch "#{shared_path}/log/puma.stderr.log"]
  command %[echo "-----> Be sure to edit 'shared/log/puma.stderr.log'."]
  command %[echo "-----> Be sure to edit '#{shared_path}/config/database.yml'."]
end

desc "make SECRET_KEY_BASE and save to #{shared_path}/.env."
task :make_key => :environment do
# 生成SECRET_KEY_BASE,并保存到.env文件里
command %[cd #{current_path} && echo SECRET_KEY_BASE=#{fetch(:bundle_prefix)} rake secret > “#{shared_path}/.env”]
end
desc "SCP local config files to remote shared config folders."
task :scpconfig do
  comment 'scp local config files'

  ssh_port = fetch(:port)
  ssh_host = fetch(:domain)
  ssh_user = fetch(:user)

  #执行本地的scp命令,将不受git控制的设置文件上传到服务器上的共享目录中
  run :local do
    command "scp -P #{ssh_port} config/database.yml #{ssh_user}@#{ssh_host}:#{shared_path}/config/"
    command "scp -P #{ssh_port} config/secrets.yml #{ssh_user}@#{ssh_host}:#{shared_path}/config/"
    # command "scp -P #{ssh_port} .env #{ssh_user}@#{ssh_host}:#{shared_path}/"

    # 本地开发环境下,可以将puma.rb放置到config/puma/目录下,
    # 按照环境分别命名为development.rb及production.rb.
    command "scp -P #{ssh_port} config/puma/production.rb #{ssh_user}@#{ssh_host}:#{shared_path}/config/puma.rb"
  end

end


desc "Deploys the current version to the server."
task :deploy do
  # uncomment this line to make sure you pushed your local branch to the remote origin
  # invoke :'git:ensure_pushed'
  deploy do
    # Put things that will set up an empty directory into a fully set-up
    # instance of your project.
    invoke :'git:clone'
    invoke :'deploy:link_shared_paths'
    invoke :'bundle:install'
    invoke :'rails:db_migrate'
    invoke :'rails:assets_precompile'
    invoke :'deploy:cleanup'

    on :launch do
      command "mkdir -p #{deploy_to}/#{current_path}/tmp/"
      # command "chown -R www-data #{deploy_to}"
      command "touch #{deploy_to}/#{current_path}/tmp/restart.txt"
      # invoke :'puma:phased_restart'

      # in_path(fetch(:current_path)) do
      #   command %{mkdir -p tmp/}
      #   command %{touch tmp/restart.txt}
      # end
    end
  end

  # you can use `run :local` to run tasks on local machine before of after the deploy scripts
  # run :local { say 'done' }
end


# mina-puma的gem引用方式可以参照作者网站:https://github.com/untitledkingdom/mina-puma
# 考虑到学习及更个性化定制的需求,这里将mina-puma的源代码直接复制到这里。
# 除了将'pumactl_socket'改成了'puma_socket'以外,其它未做改动

namespace :puma do
  set :web_server, :puma

  set :puma_role, -> { fetch(:user) }
  set :puma_env, -> { fetch(:rails_env, 'production') }
  set :puma_config, -> { "#{fetch(:shared_path)}/config/puma.rb" }
  set :puma_socket, -> { "#{fetch(:shared_path)}/tmp/sockets/puma.sock" }
  set :puma_state, -> { "#{fetch(:shared_path)}/tmp/sockets/puma.state" }
  set :puma_pid, -> { "#{fetch(:shared_path)}/tmp/pids/puma.pid" }
  set :puma_cmd, -> { "#{fetch(:bundle_prefix)} puma" }
  set :pumactl_cmd, -> { "#{fetch(:bundle_prefix)} pumactl" }
  # set :pumactl_socket, -> { "#{fetch(:shared_path)}/tmp/sockets/puma.sock" }
  set :puma_root_path, -> { fetch(:current_path) }


  desc 'Start puma'
  task :start => :environment do
    puma_port_option = "-p #{fetch(:puma_port)}" if set?(:puma_port)

    comment "Starting Puma..."
    command %[
      if [ -e '#{fetch(:puma_socket)}' ]; then
        echo 'Puma is already running!';
      else
        if [ -e '#{fetch(:puma_config)}' ]; then
          cd #{fetch(:puma_root_path)} && #{fetch(:puma_cmd)} -q -d -e #{fetch(:puma_env)} -C #{fetch(:puma_config)}
        else
          cd #{fetch(:puma_root_path)} && #{fetch(:puma_cmd)} -q -d -e #{fetch(:puma_env)} -b 'unix://#{fetch(:puma_socket)}' #{puma_port_option} -S #{fetch(:puma_state)} --pidfile #{fetch(:puma_pid)}
        fi
      fi
    ]
  end

  desc 'Stop puma'
  task stop: :environment do
    comment "Stopping Puma..."
    pumactl_command 'stop'
    command %[rm -f '#{fetch(:puma_socket)}']
  end

  desc 'Restart puma'
  task restart: :environment do
    comment "Restart Puma...."
    pumactl_command 'restart'
  end

  desc 'Restart puma (phased restart)'
  task phased_restart: :environment do
    comment "Restart Puma -- phased..."
    pumactl_command 'phased-restart'
  end

  desc 'Restart puma (hard restart)'
  task hard_restart: :environment do
    comment "Restart Puma -- hard..."
    invoke 'puma:stop'
    invoke 'puma:start'
  end

  desc 'Get status of puma'
  task status: :environment do
    comment "Puma status..."
    pumactl_command 'status'
  end

  def pumactl_command(command)
    cmd = %{
      if [ -e "#{fetch(:puma_socket)}" ]; then
        if [ -e "#{fetch(:puma_config)}" ]; then
          cd #{fetch(:puma_root_path)} && #{fetch(:pumactl_cmd)} -F #{fetch(:puma_config)} #{command}
        else
          cd #{fetch(:puma_root_path)} && #{fetch(:pumactl_cmd)} -S #{fetch(:puma_state)} -C 'unix://#{fetch(:puma_socket)}' --pidfile #{fetch(:puma_pid)} #{command}
        fi
      else
        echo 'Puma is not running!';
      fi
    }
    command cmd
  end
end

```
五、shared/config/puma.rb的内容
-
CentOS生产服务器上如果存在
shared/config/puma.rb配置文件,则mina中的puma启动参数是受该文件控制,否则mina会在命令行中指定启动参数。考虑到生产环境的还会有一个puma的自启动服务脚本,因此推荐使用puma.rb配置文件,这样就可以共享puma的启动参数。threads_count = ENV.fetch("RAILS_MAX_THREADS") { 5 } threads threads_count, threads_count # 可以选择不监听tcp端口,只监听unix socket # port ENV.fetch("PORT") { 3000 } environment ENV.fetch("RAILS_ENV") { "production" } # 定义一个项目目录的变量 project_tmp_dir = '/opt/ruby/[my_project]/shared/tmp' pidfile "#{project_tmp_dir}/pids/puma.pid" bind "unix://#{project_tmp_dir}/sockets/puma.sock" state_path "#{project_tmp_dir}/sockets/puma.state" quiet threads 0, 16 workers 2 -
macOS开发环境下,如果要根据不同的运行环境,配置不同的puma.rb文件的话,可以将[项目目录]/config/puma.rb文件转移到
config/puma/目录下,分别命名为development.rb, production.rb,例如:[项目目录]\config\puma\ development.rb production.rb test.rb
六、使用mina发布服务的方法
mina可以自由定制不同的任务。以上文的mina配置样本为例,说明在__macOS开发环境中__的使用方法。
-
将需要发布的代码push到github服务器上。例如:
git status git add . git commit -am "make a deploy version" git push -
如果是首次在CentOS远程服务器端布置应用,那么需要执行mina setup任务,初始化服务端的目录结构。
# 初始化远程服务器端的目录结构 mina setup # 将共享的配置文件scp到远端服务器 mina scpconfig -
执行发布任务。(指示远程服务器下载最新版本的项目代码作为服务器上的当前代码)
mina deploy -
手工执行puma的相关任务
puma的运行环境(development, test, production),如果在
rails_env环境变量中获取不到,则默认启动production环境。# 启动puma服务 mina puma:start # 停止puma服务 mina puma:stop # 重启 mina puma:start # 软重启(加载) mina puma:phased_restart # 硬重启 mina puma:hard_restart # 获取状态 mina puma:status
七、使用systemd自动启动puma项目
-
编辑service脚本(如果有多个ruby项目,需要为每一个puma项目编辑不同的脚本)
vi /usr/lib/systemd/system/puma_myproject.service内容样例:
[Unit] Description=Puma HTTP Server After=network.target After=mariadb.service [Service] Type=simple User=deploy WorkingDirectory=/opt/ruby/myproject/current Environment=RAILS_ENV=production #Environment=SECRET_KEY_BASE=xxxxxxxxxxx ExecStart=/home/deploy/.rbenv/shims/bundle exec "puma -C /opt/ruby/myproject/shared/config/puma.rb" TimeoutSec=300 #Restart=always [Install] WantedBy=multi-user.target -
启动脚本,并设置脚本自启动
systemctl start puma_myproject.service
systemctl enable puma_myproject.service
八、配置Nginx站点
-
编辑/etc/nginx/conf.d/mysite.conf,样例内容如下:
upstream app { server unix:///opt/ruby/myproject/shared/tmp/sockets/puma.sock; } server { listen 80; server_name www.mydomain.com; root /opt/ruby/myproject/current/public; access_log /var/log/nginx/www.mydomain.com_access.log; error_log /var/log/nginx/www.mydomain.com_error.log; # The rest of your server block index index.html index.htm; # if a file, which is not found in the root folder is requested, # then the proxy pass the request to the upsteam (myproject unicorn) location / { proxy_pass http://app; proxy_redirect off; proxy_pass_request_headers on; proxy_set_header X-Forwarded-Proto $scheme; #proxy_set_header X-Forwarded-For $proxy_add_x_forwarded_for; proxy_set_header Host $http_host; proxy_set_header X-Real-IP $remote_addr; } } -
启动脚本,并设置脚本自启动
systemctl start nginx.service
systemctl enable nginx.service